Dark Brown Brew

Dark Brown Brew

Monday, December 10, 2007

Coffee Stout and Hard Cider


Hey guys,
Ok, so last night I got back on the horse and brewed a couple of beverages. Patrick and Tori came over about 7:00pm and we got to brewing basically the exact same stout you got a taste of. The only difference with this brew was that we left out the Acid malt since this adds a lot of sourness to the final product. We wanted this in the last stout because we were trying to clone Guiness, but since this will be a coffee stout, we left it out.

I have read that there are two camps when it comes to adding a coffee flavor to beer. Some brewers use heavily roasted grains which give the beer a toasted coffee flavor. These grains are steeped like tea at the beginning of the brewing process. I actually opted for the second method which is to simply add brewed coffee to the beer.

Then we had options as to when to add the coffee to the mix. You can add it in the initial fermentation, secondary fermentation, or drop it in literally as you go to bottle the whole mess. I will add it in at bottling time. Its the easiest way and you run a much smaller risk of losing the coffee flavors to high yeast activity.

So the stout is laid to rest for a few days. We finished that brew at about 10:30 so I thought I would whip up a test cider. I still had a one-gallon glass apple juice jug that mom gave me a few weeks ago. So I went to Tastybrew.com and looked up this recipe and scaled everything down for a one-gallon batch. This was pretty imperfect and required a good bit of judgement on my part. I added 1/2 teaspoon of ground cloves to the mix for spice. Unfortunately, I had to use baker's yeast because I keep forgetting to buy extra ale yeast packets when I'm at the homebrew shop. I'm not sure that this will be a problem as this brew is supposed to come in at about 4.9% ABV, and baker's yeast can hang out in up to 6%. Heres a quick run-down of my cider brew

Ingredients:

2 cans of frozen 100% apple juice
.5 cup of Sugar in the Raw (turbinado sugar)
1/2 tsp. ground cloves
1/4 tsp bakers yeast

Process:


  • Combine frozen juice, sugar, cloves, and 1/2 gallon of water in pot and heat to 165 degrees farenheit for 5 minutes. (This is your wort)

  • Remove from heat and cool to 80 degrees.

  • Add cooled wort to primary fermenter and add cool spring water until the fermenter is full (NOTE: I left some space at the top of the jar so fermentation doesn't clog the neck.)

  • Secure the airlock and place in a warm, dark place (NOTE: I wrapped a towel around the clear glass jug...fermentation hates light.)


I am expecting this fermentation to take much longer mainly because of the preservatives in the apple juice concentrate... I checked both brews this morning and the beer is rocking and rolling while the cider seems unchanged. The recipe that I based this brew off of says that the primary fermentation takes about 2 weeks and then he put it into secondary fermentation for another two weeks... So I'll probably report back on the state of the brew in about 2 weeks when I move it to secondary. I am hopeful.. I checked the original gravity (OG) and its right in line with the OG from the original recipe. If all goes well, the cider will turn out to be around 4.5 - 4.9% ABV

I will detail how I cobbled together the airlock for the cider in another post.

Below are some pictures of the cider once it was all laid to rest... I always forget to take in-progress pictures.


Saturday, November 3, 2007

Update on the Stout

Hey Guys,
Well, after trying a beer each night starting at about three days out from bottling, it's official. Stouts take much longer to condition and build carbonation that other beers. Some websites have said that it will take maybe 2 months. Bad news... I was hoping to be drinking a good stout by now.

The good news is that the flavor has been getting better each day, so I think I will let this one sit for a month or so. My next beer, I think, will be an Oktoberfest. This will need less time conditioning before its ready to drink.

In other news, I will be going to the November meeting of the Savannah Brewer's League on Wednesday. I'm really looking forward to it. I was hoping by now to have something good enough to take a few beers in for the after meeting tasting. But, unfortunately I think my end products have actually gone down since we brewed that Witbier. I'm not sure what the deal is... whether my tastes have become more discriminating, or I'm not keeping my eqipment clean enough. I'm going to try to get some advice from the guys at the Brewer's League.

I also looked into doing an all-grain brew (basically, soaking and creating my own batch of fermentables from crushed grains instaed of using the extract that I buy from the Brew store). It looks like more equipment and a greater investment of time in the brew, but you have more control and you avoid the cost of the extract which is the vast majority of the cost of ingredients per batch.

Well, I'll be in beer touch. Be well guys... talk to you later

Monday, October 22, 2007

Rack Idea


OK,
So I do all of my fermentation and storing of bottled beer in a cabinet under my kitchen counter. Its dimensions are roughly a cube 22" on all sides. Usually, the bottles are all stood up next to each other. This is pretty inefficient as I lose the ability to use vertical space which would allow me to store all the brewing equipment when the beer is conditioning in the bottle. It would also allow me to store the bottles when they are not in use. So I have designed a rack that I will be able to set in the back of the cabinet to hold the bottles so they are lined up on their sides left to right with the cap facing the door. The illustration to the right is a rough sketch.

I will let you know how it turns out. It only requires about $5 dollars worth of wood. I'll put it together one of the days this week before we bottle on Friday.

Sigh of relief

Well,
I just racked the beer to secondary and laid it to rest under the cabinet until Friday. It looks like a good brew. The final gravity measurement came in at 1.020 with our original gravity being around 1.050. So that gives us an ABV of around 4%. If any more fermentation takes place in secondary (which it certainly did with the witbier) we'll get somewhere around 4.5% or 5% ABV which is right in line with the Irish Stout style definition (anywhere between 4-5%).

And, as always, in the course of the siphoning, I got just a tiny taste of the beer and it definitely tastes like a Guiness-type Stout.

This wort left a HUGE amount of trub (pronounced "troob", I have found out). Not only was there a lot at the bottom, but there was a thick, green paste in a rim stuck to the side of the fermenter about 2-3 inches above the top of the beer itself. I think this was the result of the Irish Moss being present in the fermentation vessel. Judging from the aforementioned taste, it seems there were no ill effects from the inclusion of the hops and moss during fermentation

It does seem that all the hops and irish moss particulate matter fell out of the beer because it went into the secondary fermenter clean and clear.

So, it seems like a success so far.

Recent Tastes


Over the past month or two I've been previewing beers to both get a better idea what I like in a beer and to develop my ability to discern different tastes. So... the report so far is that almost all of the Rogue beers are good, especially, the Chocolate Stout.

The absolute worst beer I have ever had... period, and this includes a really caustic Pilzner from czechoslovakia, is this beer right here, imagine Heineken laced with hershey syrup and Nyquil.

Probably the best beer I have ever had would be the Black Mocha Stout from the Highland Brewing Company based in Asheville, NC. Its hearty and bold. I'd recommend it to any human. Every offering I have had from Highland is really good. I will probably try their Cold Mountain Winter Ale next.

Next time I'm in Greensboro, I want to go down to Natty Greens and get a taste of their dark brews to compare with some of these.

Anyway, if you guys try anything new or awesome post about it. Maybe we can start up the Dark Brown Beer Review. Regional publication to start, and quickly expanding to become the Nation's most important periodic literature for the connoisseur of spirits both fine and crude!

Cider?

So, it was great seeing you on our way back to Savannah, Alex. You said that you had come by a pretty good Cider brew using walmart juice/cider. We should definitely pursue that. Post the details when you can or take a shot at it and keep us posted on how it goes. I've got some wine bottles that are just waiting to hold something good. I know that cider would be a big hit with everyone for xmas/thanksgiving too.

Here are a few cider recipes from TastyBrew.com:

"First Cider" - This one does the trick real fast! ABV=8.8%
"Fiesta Cider" - cheap and easy from concentrate
"Siler Cider" - real light, for a wider audience (ABV=.9%)

Back again - Guiness Clone and Mini Kegs


Hey guys,
Well its been too long since we've posted to the blog so I'd thought I would let you guys know where I'm at in my brewing. Right now, I've got a Guiness clone (Irish Stout) sitting in the primary fermenter. I'll be moving it to secondary tonight. This will be my fourth beer and its definitely getting more routine. I am getting tired of bottling though... I can't seem to get all the bottles off my counter at one time. And storing and cleaning the things takes up a lot of time. I've looked into kegging the whole batch to a Cornelius Keg but the system ends up costing around $250-$300 once you buy the keg, the tap, the CO2 regulator, etc. But I have been seeing these little Heineken mini kegs at the store and I wondered if they could be reused to store homebrew. It turns out that the Heineken kegs can't be reused, but in searching I stumbled onto a system that uses similar mini kegs (5 liters). Basically it is composed of these 5L mini kegs (requires 4 minikegs for a 5 gallon batch of homebrew), a combination tap and CO2 regulator from the Tap-a-Draft system and an adaptor that goes between the keg and the tap/regulator. The Tap-a-draft system itself uses 6L plastic bottles to hold that beer that look like giant soda bottles. Personally, I think the minikeg option is better in terms of portability and long-term storage and the cost comes out to about the same. THe minikegs are around $7-$10 each and the tap/C02 regulator runs around $45. The neat thing about the tap/CO2 regulator is that it uses 2 CO2 cartridges (box of 12 is $7 and lasts about three homebrew batches). Since it uses 2 cartridges, you can substitute an N20 cartridge and have the necessary gas mixture for that characteristic Guiness Foam in your stouts. Anyway, I thought that this setup could really be used if we wanted to bring some seasonal ale up to the Mountain house or to Greensboro during the Holidays.

I've been brewing with a guy that Jenny works with, Patrick. He and his girlfriend are very much into brewing and this will be the second beer we've worked together on. This Guiness clone has been very different from the others. First off, its uses much darker roasted grains and a much thicker malt extract. In addition to the hops it also called for Irish Moss which acts as a clarifier during fermentation.

The brew was so thick, in fact, that the hops and Irish Moss particulates did not settle to the bottom during the cooling process after the boiling. In both the porters and the Witbier, simply siphoning the cooled wort into the fermenter and taking care not to let the hose suck from the bottom of the pot was all that was needed to avoid adding the boiled hops into the mix. But this time around, pretty much all of the hops and irish moss made it into the primary vessel. I am hoping that the addition of the spring water will have diluted the mix enough that that stuff settles out and I won't have to strain the beer into the secondary vessel. I am also hoping that the particulates won't make the beer too bitter.

Guiness is a really bitter beer and definitely has a touch of sourness to it (actually the sourness comes from a special "Acid Malt" that is steeped along with the other roasted barleys and malts ), but I'm curious to see if it is too bitter. I really hope not.

Anyway, I will be moving it to secondary tonight (Monday 10/22) and bottling (yes, unfortunately, the mini keg system will have to wait) it probably Friday. So in about a week or so, I will have a taste report for you.

Tuesday, July 17, 2007

Barebones Beer

So I guess the thing that amazes me is how forgiving the brewing process is. I stumbled upon this article in Mother Earth News a few weeks ago and just found it again. It gives a pretty basic DIY recipe and process for homebrewing. Its basically a hopless beer where the only ingredients are baker's yeast, malt extract, plain old sugar, and tap water.

This dude probably flavors his coffee with stump water!

Click here for the article... its bizarre. We should try it once to compare resutls

Monday, July 16, 2007

AHHHHH!!!!

OK, so after weeks of hemming and hawing over this or that and fretting over details..... I have finally purchased a brew kit and all the ingredients to brew a robust porter from scratch. EXCELLENT! So, I was going to tackle the task Sunday night (7/15), but got bogged down with other stuff. So, the backup day was today (7/16). The Kitchen is spotless and rearranged to make room for equipment. Dinner has been cooked, eaten, and cleaned away. All that is left is to buy spring water at the Kroger three blocks away.

So I pop over and spend longer than I wanted to in line (this would become the absolute least of my worries.) Head back home and pull out the strong sturdy keychain and WHAT?!? NO KEY?

Somehow the only key I need to get into my apartment is totally vanished from my keyring. The keyring, I will add, that I use SPECIFICALLY because it never opens enough for keys to be removed even when you want it to. I have broken hardened steel blades trying to pry that bitch open enough to slip a key on or off.

So now its 10:40pm and i've been inside the door maybe 10 minutes (thanks to our temporary neighbors who saved us by tossing down a keychain). The universe has won... I will not brew tonight.

But tomorrow... oh tomorrow it's on!

Tuesday, July 10, 2007

tastybrew.com post

I posted this last night to see if I can get some answers on an ale i want to make and to get us involved with this online community, cause I think they are a good resource. Watch to see if we get any posts.


Subject: Ales arent they supposed to be without hops? [edit]
Author: DarkBrownBrew


Jul 11th, 2007
12:18 am
So I am BRANDNEW to homebrewing and am actually studdying fermentation as part of an internship with the National Science Foundation at the University of North Carolina at Pembroke. Of course i'm am working with a bioluminescent bacteria, but fermentation applies to alcohol production too ... besides I also like to drink.

I have been doing some research and the KotMF brewing glossary put in its definition for ale a historical note;
"In historical times, the term ale referred to fermented malt beverages which were brewed without hops, with the term beer being used to refer to hopped malt beverages." so i am interested in try to make an ale.

But KotMF also adds in the definition that the name ale is loosely used now "In some states in the US, any beer over a certain strength must be labeled "ale" by law, regardless of whether it is technically an ale. Hence the odd practice of putting the word "ale" on the labels of strong lagers (e.g. Doppelbocks) intended for the US market.]"

I was hoping to make an ale like a Witbeir, which falls under the Belgian and French Ale BJCP style categorie giving some of the commercial examples as Blue Moon, Hoegaarden Wit etc.

I'm confused, my question is, is there something i'm not getting? how does one get a Witbeir with an IBU of 10-20% without using Hops? I have been drilling the calculators supplied on this website to no success. Do these ales actually use hops at some point in the process, meaning they aren't historically traditional ales, or is there something i havnt found yet in my research? ANY comments would help.

« Back to Forum Index

Monday, July 9, 2007

Witbeir/Hefeweizen

The way we three are ontop of the same thing at the same thing... well it just has to be genetics. So u have a chocolate stout Josh, i'm in pursuit of a Hefeweizen. Dad is picking me up some malt extract and Hops, I'm also going to use some oatmeal as a portion of the fermentables. I used the calculators on Tastybrew.com to calculate my beer by plugging in ingredients and measurements into the formulas to come up with the beer i wanted and compared it to the style standard to make sure i was pulling off what i want (I LOVE HEFE'S!) here is a pic of my screen with the ingredients and factors computated together. The pic has to be up on its side or else the toolbar covers the info.

Photo Sharing and Video Hosting at Photobucket

Off to see the wizard........

OK Guys. I'm probably going to get some beer brewing supplies and equipment in the next day or two from the Savannah Home Brew Shoppe. I spoke with the guy a few weeks ago and he said that he has a kit he has put together from his normal stock. It's more money than the Mr. Beer sets you can buy online, but my guess is that the equipment allows for a greater volume of beer per batch, plus the ingredients are almost certainly of a higher quality.... I am going to play it safe and make a standard, follow-the-recipe batch to begin with. Pretty quickly, though, I want to move on to something more complex (and hopefully rewarding). Check out some of the homebrew recipes on that excellent site Alex found, Cryptobrewology. I am particularly interested in the Coffee Oatmeal Stout. I will give a full report on the Savannah H.B. Shoppe and the attempts at our first beer. I am really going to try to take pictures and keep full notes.

I am also currently handbinding a book, specifically a leather-bound journal. I think we all three need matching brewlogs so we can keep notes and brew related information handy. I'll keep you guys posted.

Sunday, July 8, 2007

homebrew supplies store list

so i was poking around on the internet and found a website that lists homebrew supply stores for each state. Here is the link.

Friday, July 6, 2007

future dates

alright so i was looking at the triad homebrew supplies store in Greensboro and i noticed on their website that they host a brew demo infront of the store every second saturday of the month 12pm to 3 pm. This could be a good field trip for DBB. Also on the page is a link for the battleground brewers guild which meets every 3rd Wednesday of the month, Dad i think that might be a good investment of time, not to mention fun as hell.

Thursday, July 5, 2007

WE'S LEGIT!

alright dudes, i actually went ahead and registered us on tastybrew. We are registered as DarkBrownBrew, the password is my dogs name no space first and last no caps. Check the place out. I havnt figured out how to post a link for the blog though.

07-05-2007

you keep working on the domestic wine! remember ur efforts to imbibe are for research purposes! also did u get the yeast's and stuff? i think i might try one of these places online and see if they can ship me something, i'm so doing beer next. I found this wicked website with all kinds of recipes. By the ways I have been reading alot about the whole bottling bit and found that when fermentation is complete often the drink is completely alchoholy tasting and alot of commercial wines will add alittle juice to the drink once fermentation is complete to sweeten it up. I have had to do that with a couple of my blackberry ferments. let us know how things are going, what u been up to Josh?

CHEERS!

Saturday, June 30, 2007

June 30th MGHW061607DBB 1 Brew Update

Greetings fellow Brewmeisters!! This is the official two week update on the progress of our MGHW061607DBB 1 Brew batch:

First, a few vital statistics:

Storage temp. - 75 degrees (+-2)

Location - countertop next to frig.(original site)

Length of time fermenting - 14 days and counting

Disposition of CO2 - manually released 6-8 times/day

Color and Clarity - dark purple and opaque, unchanged

Yes our Brew is still working quite nicely and the fermentation process seems to still be going strong. I have noticed a distinct aroma of alcohol whenever I release the CO2 and this is indeed a good thing. I am thinking of getting some real wine making yeast to add (with sugar) to the Brew after the initial fermentation is complete in the hopes of augmenting its alcohol content with a second round. Any thoughts on this matter would be appreciated. It may be tricky to do and not introduce outside contaminants. I am not sure how much longer the brew will go but I am in need of corked empties to decant the finished product into. To this end, I have dutifully purchased some cheap domestic wines and am currently removing their contents as quickly as my good sense allows me to. Anyway that is wher things stand this evening. Aloha!!

Thursday, June 28, 2007

Alright so I talked to Dad on the phone today and the whole fermentation thing came up, specifically Humulus Lupulus and its distribution in the states. So I got some info digging done and here is a Little of what I found.
There are two species of Humulus native to North Carolina, lupulus and japonica. We are only concerned with Lupulus, i don't think beer is made from the species japonica. The distinguishing characteristic between these two species is actually, big sigh of relief, not freaking unbelievably difficult to recognise. Its not some back ass screwed up botanical systematics nightmare attempt to be high and mighty characteristic. Count the lobes on the leaves, Lupuls spp. has three lobes, japonica spp. has 5-9 lobes. Now the species Lupuls has four varieties, two of which grow native one is introduced and the other species grows out west. I believe all three of the varieties in our area would be fine for brewing beer, and could make an interesting experiment as to which variety taste best. The varieties in our Area are:
Humulus lupulus var. lupulus
Humulus Lupuls var. pubescens
Humulus Lupulus var. Lupuloides

I used Gleason and Conquest's Manual of Vascualar Flora (second edition) for the tip between lupulus an japonica, also it gave a nice description of the families characteristics, so maybe we can keep an eye out for the vine. Here is the entry:

Rhizomatous perennial vine to 10 m; principal leaves as broad as long, cordate at base, 3- lobed to below the middle, the upper leaves often broadly ovate and lobe less, petiole shorter than the blade; staminate inflors 5-15 cm; pistillate spikes 1 cm, becoming 3-6 cm, the persistence, accrescent bracts entire and mostly blunt stramineous, very glandular at base; 2n = 20. Moist soil; N.S. to MA., Mont. and Calif., s to N.C., Ark,. and Ariz,. and widely distributed in the Old World. July, Aug, 5 geographically significant vars., 3 in our region.

Now Var. Lupulus i found is supposed to be a cultivar from Europe, but has escaped and is now introduced into our area. I am not sure if this means its native now, i think it might be naturalised by now. Var. Pubescens is in our area but this plant is more in the midwest of America. and the last var. Lupuloides grows east of the rocky mountains, i think this is the variety we are going to find the most easily.

ALOT more could be said, but i will leave that for later posts, i think this will arm us with an idea of what we should look for, oh ya and by the ways, we are looking for the female plants they have the goods! peace

Sunday, June 17, 2007

A Meeting of Minds: 6.16.07


The three of us met in Greensboro for Father's Day weekend. Saturday we went traveled to the Brown Farm to visit our fahter/grandfather for the day. While there, we tapped into his knowledge of brewing and winemaking which he, in turn, had learned from his father. The process for grape (usually scoppernong) or blackberry wine is described as follows:
(Note: for the purpose of naming, I will refer to my great grandfather as Brown v1.0, his son as Brown v2.0, his son as Brown v3.0 and my brother and I as v4.1 (myself) and v4.2)

Mash the grapes, skins and all, and mix with the sugar and warm water and place into a vessel with a cloth tied over the opening. The vessel used in this case was a large clay urn or stoneware pot. Let this mixture sit in a dark place. The

This is v1.0's process for making wine from grapes or blackberries:

Mash grapes skins and all, and mix with the sugar and warm water (around 5 gallons). Place the mix into a large earthenware pot and tie a cloth over the opening. Set this on a shelf in the smokehouse and leave it for about week or until it starts to smell. This is a first fermentation that takes advantage of the natural yeast found in the skins of the grapes themselves. Then this mix is strained through a cheesecloth into a 5-gallon carboy, the yeast is added and the carboy is closed up with a stopper complete with fermentation lock (tube that runs from the carboy down to a small cup of water allowing the carbon dioxide to escape the bottle, but preventing bacteria and oxygen from entering the bottle). The carboy is then placed in the root cellar where it sits until the production of CO2 stops. Then a measure of apple jack brandy is added to "stabilize" the wine so that it stop fermenting and the taste remains stable.

This procedure produced a very drinkable wine. I know this from personal experience too. My grandfather poured out a measure of wine for us to taste. The liquid was older than I am, but it went down smooth.

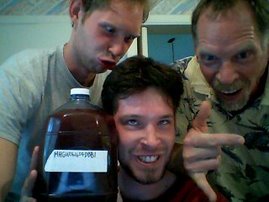
SO... we have set up another ferment. MGHW061607DBB 1 has been created and is featured in the image above along with three vagabond tramps taking reguge in our basement. more to come

Thursday, June 14, 2007

Humulus lupulus

Not much happened today as far as the ferments go, they are just sort of chugging along on the porch still so I'm leaving them be.
On a more botanical note, I did find out (to my pleasant surprise) That Humulus lupulus grows natively in North Carolina. Now anyone who knows me knows that I have a particular fascination with collecting and using native plants for various uses; I wont get to into it, cause I don't want to seem like too much of a dork but Humulus lupulus is hops, beer hops.
Now how freaking cool would it be to brew and drink beer made from hops collected from the wild with your own to hands!? Anyways relying on one of my favorite websites to haunt i found its county distribution.
Because I'm a sucker for biological art, especially renderings of plants I thought I would put up this pretty picture to end the post with, use it though.. keep an eye open for this tasty plant.


Wednesday, June 13, 2007

16-13-07, 2:45 pm

-Tested sample of BBF061307AMB1 (the brier berry ferment) on a handle held refractometer by zeroing scale using d.i., then I added a couple of drops of BBF to the prism.
Adding all the sugars I did made a super saturated solution since the solution is at 100 % salinity. I know it has been fermenting since I saw bubbles last night before I went o sleep, this morning when I woke up and having the bottle about explode this afternoon when I went to release some CO2. since it bubbled over like it did i took the oppurtunity to collect and sample BBF without having to completely remove the top.
The reading was 100 % salinity or 1.076 at 2:45 for BBf061307AMB1 after fermenting for 14 hours all last night and today.

after some number crunching and brain storming for GAB060807AMB1 we figured out the initial specific gravity before any of the sugar was fermented was 100% or 1.076 salinity. This was determined by making a solution of sugar to water of 100 ml at the same ratio of sucrose to H2O that i used when I mixed the recipe i got offline for the ginger beer.
The original recipe called for 1 cup of sugar in 1.89 liters of H2O which is the same as 240 grams of sucrose to 1,890 ml of H2O, Grams to Microliters is a one to one relationship. So this means that dividing 240g of sucrose/ 1,890 ml H2O = .126984 which is the ratio of sucrose to water of the original volume. taking this ratio and multiplying it by 100 (for 100 ml, i wanted a nice small easy to test sample) gives u 12.69 which is the grams of sucrose needed to recreate the ratio of sugar to water in the initial 1.89 liters of H2O. So I did this and measured it on the hand held refractometer and found this to be a value of 1.076 OR 100% salinity! apparently the recipe knew this ratio of sucrose to water would be 100% salinity.
So then I measured a sample of GAB060807AMB1 with the refractometer today. I got a reading of 1.053 or 70% as the final salinity. Subtracting 70% from 100% equals a 30% reduction in sucrose meaning 30% has been converted to alcohol. Typing these intial and final refractomter readings with the temperature during fermentation into an online calculator gave me an abv of 3.0%!! YEAH!! can't wait to work with all this some more and get to where I am making 6.0% abv.

DIY USB Temperature and Atmospheric Pressure sensor


I think this might be able to help us out in terms of maintaining and/or monitoring the effects of environmental variables on our processes and results. Apparently its pretty simple to put together. Repost below from the MAKE blog.


Raph writes -
This is a project to interface sensors to an USB port for collecting weather related data such as temperature. The firmware supports many different sensors and interfaces. At the moment, temperature, relative humidity and atmospheric pressure can be measured, logged and graphed.


Click on the read link to see more info on the sensor - Link

Tuesday, June 12, 2007

06-13-07

So feeling as if i have been getting to much sleep lately, i decided to try out a new recipe with some brier berries i picked up today earlier this evening, here is what I mixed.

Brier berry ferment:
1cup sugar = 3 parts refined, 1 part raw
1/4 teaspoon baker's yeast
1 tablespoon brown sugar
2 teaspoons vanilla extract
1 tablespoon ginger
1/8 cup lemon juice
1/2 tablespoon Mai-Chai tea
1/2 cup crushed brier berries

I used the ginger beer recipe as a template for this ferment so i mixed everything the way the ginger beer was mixed, i just grouped the new ingredients with the like ingredients of the ginger beer recipe. In other words i mixed sugars and yeast together in one step then threw that in the 2 liter soda bottle. Next i put the vanilla extract, lemon juice, ginger root, Mai-Chai and smushed brier berries in afterwards making sure not to remove the funnel throughout the entire process; then i just added the sterilized water.
The water was totally room temp. this time because i had slightly warm and slightly cold sterilized water in two different milk jugs so i mixed equal parts of both jugs until i filled up the 2 liter with all the ingredients. I feel real confident about this batch. The solution looks SO COOL!! I'm keeping this batch indoors during its fermentation cause i feel better about the whole consistent temp thing at about 75 degrees F, Anyways off to sleep.

06-12-07

So I had two ferments going on the porch, now I have one still a brewin and the other in the fridge. GAB060807 stopped this afternoon after i took about 500 ml from the bottle last evening and replaced it with the comparable amount of sugar, yeast and water to replace what i had snatched from the bottle. I took the 500 ml out because no more C02 was being produced at the time, this was evaluated by me squeezing and getting no denting action. The 500 ml of solution seemed to be sorta potent since i think i got a little buzz (it was a three day old ferment) but i did eat some home made sushi from a neighbor shortly before drinking the 500 ml so... really who knows. Like i said though i added back 500 ml of sterile water (i boiled then cooled the water in an ice bath before taking out the 500 ml) and did some quick math to add back an equivalent amount of sugar and yeast to match the original recipe, about 1/4 a cup of sugar and a 1/16th of a teaspoon of yeast to the 500 ml of strile replacement H2O. Fermentation wasn't starting so i thought i would give it the night, the next morning (06-12-07) it was a good and bubblin with C02 producin action. I left GAB060807 alone all day today just checked it every now and about 8 o'clock this evening i gave it a squeeze and the bottle dented.
There were no bubbles so I figured the fermentation bit was done with, maybe because there is simply to much alcohol in the bottle now for baker's yeast to survive in. I have been sorta supporting this claim because I found a website that says that baker's yeast can only hang out in about 6% alcohol max. Again i drank about half of the two liters tonight and i feel a little something. Six % at least would be required since i am such a lush (how about them scientific method skills HA!?)
Then again maybe GAB060807 isn't 6% and I simply choked the yeast with to much sugar or i let to much oxygen into the system when i took the 500 ml out and was to impatient to give the system enough time to deplete the oxygen trapped in the bottle upon closing it last night to begin signs of fermentation again.
Though I don't buy the idea that i stopped fermentation last night when I added oxygen or sugar back into the system last night because I saw it bubbling today and only ceased signs of fermentation earlier this evening. Thats why i support theory one or maybe simply all the sugar had been gobbled up by the time i checked it earlier this evening. Even with me putting more sugar in the bottle i added more yeast so the sugar to yeast level was never out of whack. Plus i was careful to not disturb the turb and only siphoned off the top 500 ml, maybe fermentation was on overhaul from the combination of new and already present yeast making fermentation of the small 1/4 of a cup of sugar real quick like over night quick.
I still have not come to a conclusion though. I am thinking my idea of not adding any kind of acid to GAB060807 was not such a great idea since i found on the same website that apparently acids are a must in fermentation. Also i didn't add any tannins, the ginger might have added some acids, but it sure as hell didn't add much and no tannins. I picked about a half gallon of wild blackberries today (there are big advantages to being a botany geek). I'm going to boil these and add ginger root, sugar, lemon and maybe something else ..or not for my next batch of fermentation. I still have one ferment on the porch which since it has been so rainy yesterday and today (was it to cold last night!?) I'm bring GAB060907 in tonight in case temps drop to much. For as much precipitation we get around here, the temperature gradient sure as hell feels like a damn desert sometimes!
I managed to exert almost all of the will power i have to not imbibe the rest of my ferment (it was hard work, daddy needs his medicine) and tomorrow i am taking both the active and finished ferments into the lab for testing on the spectrophotometer, refractometer and with the hydrometer. I think I'm also going to do some titration and chemical analysis, i don't have to go to the greenhouse so its all day lab madness baby!!
Anyways in the mean time will be keeping an eye on GAB060807 in the fridge since I'm not down for midnight splosions and i will post the results of tomorrows lab tests. I will also be munching on tasty wild blackberries and watching turner and hootch in my underwear until the sun comes up. Goodnight all.

Continued Growth

So, having placed the ale in the refrigerator Sunday afternoon after leaving it on the counter and narrowly avoided an exploding container.... It appears that the mixture is still actively producing CO2. I'm sure that there is still sugar for the reaction to take place, but I also wonder if the refrigerator is not cold enough (we've known for a while that it isn't as cold as your average refrigerator). So at what temperature is fermentation effectively stopped? By the way, the ale taste less sweet than it did on sunday and a new batch of turb has formed on the bottom (albeit a much much smaller amount than originally). So, Alex, whats the state of your runs?

Sunday, June 10, 2007

Pushing Towards Measurement

Below is an abstract of a submission to the patent office of a device that would measure the concentration and temperature of a liquid using reflectance. The abstract does a good job of describing the proposed device and method so I'll let it do the talking...

"An apparatus and method for temperature and concentration measurement at liquid surfaces using reflectance. The apparatus includes a light source which produces a measurement light beam, and also includes a detector. The measurement light beam has a measurement light beam intensity and impinges on the surface of the liquid specimen. It reflects back as a reflected light beam with a reflected light beam intensity which is related to the reflectivity R of the liquid surface and to the measurement light beam intensity. The detector receives the reflected light beam and determines the reflected light beam intensity. Either the temperature or concentration of the liquid specimen can then be determined based on the reflected light beam intensity. The light source can be a coherent light source, such as a laser. A beam splitter can be provided to split the light beam from the light source into a reference light beam and the measurement light beam. The reference light beam is used to compensate for fluctuations in the light source. Temperature measurements can be conducted on a pure liquid or a multi-component liquid with a substantially constant concentration. Concentration measurements can be conducted on a multi-component liquid which is maintained in a substantially isothermal condition. The method of the invention includes causing a measurement light beam with a measurement light beam intensity to impinge on the surface of the liquid specimen; detecting a reflected light beam; and determining either the temperature or the concentration of the liquid specimen. The measurement light beam can be caused to impinge on the surface of the liquid at an angle which enhances the change of reflectivity with respect to temperature or concentration. Detection of the intensity of the light beams can be carried out using photodiodes, amplifier circuitry, and relatively low-cost digital voltmeters."

The question this beings up for me is What relationship is there between concentration and density? It may be a snap to measure the concentration of a mixture of water and ethanol, but it in a real-world situation, the fermentation mixture would include many things. So while we might be getting measured differences in concentration, we miay not necessarily be measuring the concentration of ethanol.

It has been too long since I tok chemistry. Is there a well-defined or reliable relationship between the concentration of a multi-component liquid and its density?

Another resource

Hydrometer
I found this information that helpd me understand a little better how alcohol content is measured in a liquid. There is Specific Gravity (SG) which is the measurement of the density of a liquid at a given temperature as compared to the density of water at that same temperature.

This is measured with a hydrometer. There is also the Plato or Balling scale which is a derivative measurement based on the correllation between specific gravity and the weight of sucrose by volume. This website explains the relationship between the two measurement systems and the various ways of converting between them.

Results of first test

6/10/07
12:30am - Released CO2 pressure
9:30am - Placed the bottle in the refrigerator to chill

At 11:30am, I tried to follow the advice of the initial instructions and strain the mix through a coffee filter, but the filter was not porous enough to allow the mix to flow through it in a reasonable amount of time. Alternatively, I used the bottom half of a tea infuser to strain most of the ginger out of the mix. I still felt the need to strain using more of a filter, but other attempts were unsuccessful. Perhaps a fine wire mesh would be better and more convenient. As it stands now, I have placed the liquid in the left over spring water bottle and placed it in the refirgerator. Much of the carbonation was lost with the repeated straining.

One question I have is, Exactly how much does the mix need to be strained to make it safe for consumption. My biggest worry was that consuming the drink without running it through a substantial filter would allow the ingestion of a large amount of active yeast.

I have tasted the drink in small amounts. It is decent...sort of like a cross between lemonade and ginger ale. But, as I said earlier, the drink is mainly flat.

As an experiment in fermentation, I am pleased. The conditions were obviously met to have the yeast and other nutrients react favorably.

My next run will differ mainly in the use of better tools. These will include:
  • fine wire mesh for straining
  • one-way valve to release CO2
  • a funnel

MOVED FROM COMMENTS: first post from DoItUrslfJunky

In the future i will write all my days lab notes as separate entries, I'm just putting them all together today to catch up my posts with my notebook.

06-08-07
* Began first ferment, GAB060807AMB1,at 9:30pm. Mixed ingredients in 2 liter soda bottle. Only deviation is using "Quick Rise" yeast instead of normaly active baker's yeast.
83F.

06-09-07
* 10 am released CO2 pressure in GAB060807AMB1, the bottle has been sitting in indirect sunlight. Porch temp = 84F.

* Noticed very little head space in bottle, need to allot for that in future.

* 11:50 am had to loosen cap some more.

* Started new bottle of ginger beer at 7 pm tagged GAB060907AMB1. 83F It differs from GAB060807AMB1
-has a one way valve fermenter lock made from the decapitated pump of a 75 ml liquid soap dispenser.
- spring water used was cold from 20 hrs in the fridge when yeast was added.
-added 1 tbsp brown sugar to ingredients
-bottle was compressed some and had 2 in. head space.

06-10-09
Checked ferments at 10 am this morning, they seem fine, didn't mess with them any, no need. 82F

Saturday, June 9, 2007

The Initial Brew

Alright...
So Alex and I have begun brewing ginger beer and its great to actually be getting into the D0-It-Yourself spirit. We have used this recipe as a guide in our initial runs. We have independently attempted this recipe. In my run, the only deviation from the instructions was the use of "Fast Rise" yeast designed to work roughly twice as fast as normal baker's yeast. Alex will no doubt be able to give a more accurate and detailed account of his first two runs. I will post again with results once my first attempt runs its course (Sunday morning).